使用 .net 6 寫的 Worker Service 編譯為 Windows 服務後,需要提供給客戶安裝使用
原本是使用 NSIS 打包成 exe 的安裝檔,但是客戶希望使用 MSI 大量派送安裝
故研究了一下使用 WiX Toolset 似乎是較為理想的方式,可以透過 XML 編輯
WiX Toolset: https://wixtoolset.org
目前 Wix 的版本 4 好像還沒有正式版,所以是安裝 3.11 版本
透過官方網站提供的下載點(Github Release)可以下載到最新版本的安裝檔
除了 WiX 本身的安裝檔之外官方網站也有提供 WiX v3 – Visual Studio 2022 Extension
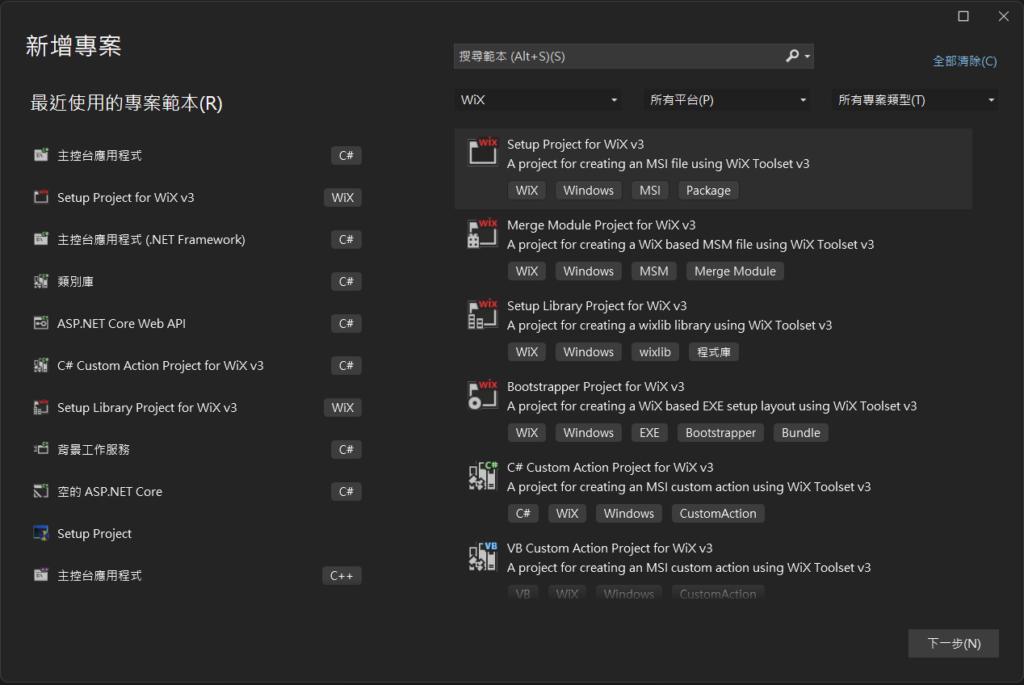
方便我們在 Visual Studio 2022 的環境下可以建立 WiX 專案

使用 Setup Project for WiX v3 的專案建立
建立後可以發現目錄底下有 Product.wxs 檔案,這是 MSI 安裝程式主要的 XML 結構如下
<?xml version="1.0" encoding="UTF-8"?>
<Wix xmlns="http://schemas.microsoft.com/wix/2006/wi">
	<Product Id="*" Name="SetupProject1" Language="1033" Version="1.0.0.0" Manufacturer="" UpgradeCode="7ab0bd7e-538d-407a-bca5-a497bba02c97">
		<Package InstallerVersion="200" Compressed="yes" InstallScope="perMachine" />

		<MajorUpgrade DowngradeErrorMessage="A newer version of [ProductName] is already installed." />
		<MediaTemplate />

		<Feature Id="ProductFeature" Title="SetupProject1" Level="1">
			<ComponentGroupRef Id="ProductComponents" />
		</Feature>
	</Product>

	<Fragment>
		<Directory Id="TARGETDIR" Name="SourceDir">
			<Directory Id="ProgramFilesFolder">
				<Directory Id="INSTALLFOLDER" Name="SetupProject1" />
			</Directory>
		</Directory>
	</Fragment>

	<Fragment>
		<ComponentGroup Id="ProductComponents" Directory="INSTALLFOLDER">
			<!-- TODO: Remove the comments around this Component element and the ComponentRef below in order to add resources to this installer. -->
			<!-- <Component Id="ProductComponent"> -->
				<!-- TODO: Insert files, registry keys, and other resources here. -->
			<!-- </Component> -->
		</ComponentGroup>
	</Fragment>
</Wix>
註解的地方是要放置檔案的位子
幾個比較重要的欄位需要注意
Product – Id: 這個是對應安裝完成後的 Product Code 輸入 * 的話每次安裝完成後都會隨機產生 Guid
Product – Version: 這個是 MSI 安裝完成後的版本,之後如果有做更新服務,會參考此版本號
Product – UpgradeCode: 這個是更新 MSI 用的,如果是相同的 Code 會做更新否則會視為不同軟體
輸入重要欄位的資訊後,接著可以使用 File 建立要放入的檔案
<?xml version="1.0" encoding="UTF-8"?>
<Wix xmlns="http://schemas.microsoft.com/wix/2006/wi">
	<Product Id="*" Name="Main Service" Language="1033" Version="0.1.2" Manufacturer="Technology lnc" UpgradeCode="6fa4caeb-d239-49c2-bdd8-ae8c0e84d9dd">
		<Package InstallerVersion="200" Compressed="yes" InstallScope="perMachine" />

		<MajorUpgrade DowngradeErrorMessage="A newer version of [ProductName] is already installed." />
		<MediaTemplate EmbedCab="yes" />

		<Feature Id="ProductFeature" Title="GDMS" Level="1">
			<ComponentGroupRef Id="ProductComponents" />
		</Feature>

	</Product>

	<Fragment>
		<Directory Id="TARGETDIR" Name="SourceDir">
			<Directory Id="ProgramFilesFolder">
				<Directory Id="INSTALLFOLDER" Name="Main Service" />
			</Directory>
		</Directory>
	</Fragment>

	<Fragment Id="FileFragment">
		<ComponentGroup Id="ProductComponents" Directory="INSTALLFOLDER">
			<Component Guid="*">
						<File Source="C:\temp\main.exe" />
			</Component>

			<Component Guid="*">
				<File Source="C:\temp\service.dll" />
			</Component>

		</ComponentGroup>
	</Fragment>
</Wix>
這樣加入了兩個檔案分別為 main.exe 與 service.dll
INSTALLFOLDER 表示安裝的路徑
接著因為是要安裝成為服務,所以除了安裝檔案之外還要加入安裝服務的控制項
<?xml version="1.0" encoding="UTF-8"?>
<Wix xmlns="http://schemas.microsoft.com/wix/2006/wi">
	<Product Id="*" Name="Main Service" Language="1033" Version="0.1.2" Manufacturer="Technology lnc" UpgradeCode="6fa4caeb-d239-49c2-bdd8-ae8c0e84d9dd">
		<Package InstallerVersion="200" Compressed="yes" InstallScope="perMachine" />

		<MajorUpgrade DowngradeErrorMessage="A newer version of [ProductName] is already installed." />
		<MediaTemplate EmbedCab="yes" />

		<Feature Id="ProductFeature" Title="GDMS" Level="1">
			<ComponentGroupRef Id="ProductComponents" />
		</Feature>

	</Product>

	<Fragment>
		<Directory Id="TARGETDIR" Name="SourceDir">
			<Directory Id="ProgramFilesFolder">
				<Directory Id="INSTALLFOLDER" Name="Main Service" />
			</Directory>
		</Directory>
	</Fragment>

	<Fragment Id="FileFragment">
		<ComponentGroup Id="ProductComponents" Directory="INSTALLFOLDER">
			<Component Guid="*">
				<ServiceInstall Id="MainServiceInstall" Name="MainService"
                  DisplayName="Main Service"
                  Description="Main Service"
                  ErrorControl="normal"
                  Type="ownProcess"
                  Vital="yes"
                  Start="auto"
                  Account="LOCALSYSTEM"
                  Interactive="no" />
				<ServiceControl Id="MainService" Name="MainService" Start="install" Stop="both" Remove="uninstall" Wait="yes"/>
				<File Source="C:\temp\main.exe" />
			</Component>

			<Component Guid="*">
				<File Source="C:\temp\service.dll" />
			</Component>

		</ComponentGroup>
	</Fragment>
</Wix>
有些 Id 需要有些不用,我 Id 都亂填的 …
使用 ServiceInstall 加入這個 Windows 服務,並用 ServiceControl 控制服務
這樣簡單 Windows 服務封裝的 MSI 檔就完成了
針對專案建置後,即可在目錄底下產生 MSI 的安裝程式
另外目錄底下會有一個 wixpdb 的檔案,也可以把此檔案一同壓縮進 MSI 程式
在專案的屬性頁面 Build 分頁中的 Suppress output of the wixpdb files 選項勾選後
在編譯 wixpdb 檔案就一起被包進 MSI 安裝程式了~
Ubuntu 下封裝 MSI
另外因為其他需求需要再 Ubuntu 環境下封裝 MSI
可以使用 wixl
sudo apt install wixl就可以把 wxs 檔案放置指定目錄然後使用 wixl 指令進行封裝
wixl -v product.wxs -o /var/output/product.msi詳細的命令參數可以參考: https://manpages.ubuntu.com/manpages/xenial/man1/wixl.1.html
wixl 和 WiX Toolset 雖然都是使用同樣的 XML 進行封裝
但是因為是不同程式與版本,有些 XML 的物件支援度不一樣,這裡產生了很多問題 …
有些 Tag 在 wixl 需要 Id 而 WiX Toolset 不需要,甚至有些 Tag wixl 直接沒有支援
挺多問題的,官方文件也沒有寫得十分清楚,只能慢慢測試了~
